Frequently Asked Question
Purpose
Use this article to learn how to add a text box to a Microsoft PowerPoint slide.
Text boxes let you place text anywhere on a slide. You can also resize, move, and rotate them after they are added.
Before you begin
You will need:
- Access to Microsoft PowerPoint
- A PowerPoint presentation where you want to add a text box
Quick steps
1. Click the Insert tab.
2. Click Text Box.
3. Click and drag on the slide where you want the text box.
4. Type your text.
5. Resize, move, or rotate the text box if needed.
Visual walkthrough
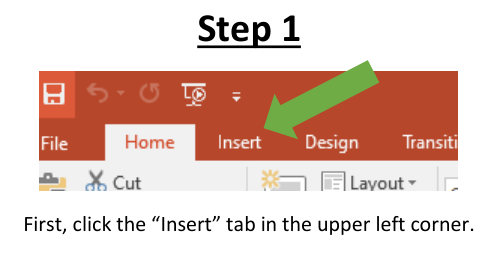
Step 1: Click the Insert tab
In the upper left area of PowerPoint, click the Insert tab.
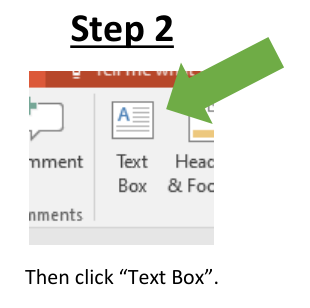
In the Insert tab, click Text Box.
Step 2: Click Text Box
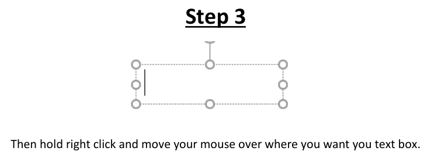
Step 3: Draw the text box
Click and drag your mouse on the slide where you want the text box to appear.
After the text box appears, you can type inside it.
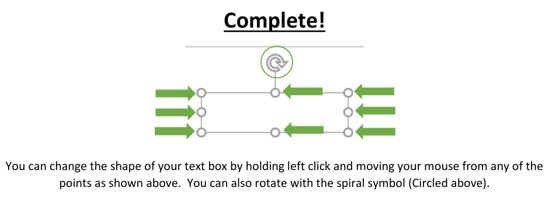
Step 4: Resize or rotate the text box
You can change the size or shape of the text box by clicking and dragging one of the points around the edge of the box.
You can also rotate the text box by using the circular rotate symbol above the box.
Expected result
A text box should appear on your PowerPoint slide.
You should be able to type inside the text box, move it, resize it, or rotate it as needed.
If this does not work
Try clicking the Insert tab again, then choose Text Box.
Make sure you click and drag on the slide to create the text box.
If this walkthrough does not resolve the issue, please contact Lake Land College IT Support for assistance.
Submit a ticket: https://helpdesk.lakelandcollege.edu/
Call: 217-234-5261
Search Terms:
PowerPoint text box
add text box PowerPoint
insert text box in PowerPoint
PowerPoint add text
how to type on a PowerPoint slide
PowerPoint text
add words to PowerPoint
PowerPoint resize text box
PowerPoint rotate text box
move text box PowerPoint
edit text box PowerPoint
draw text box PowerPoint